Page number 8
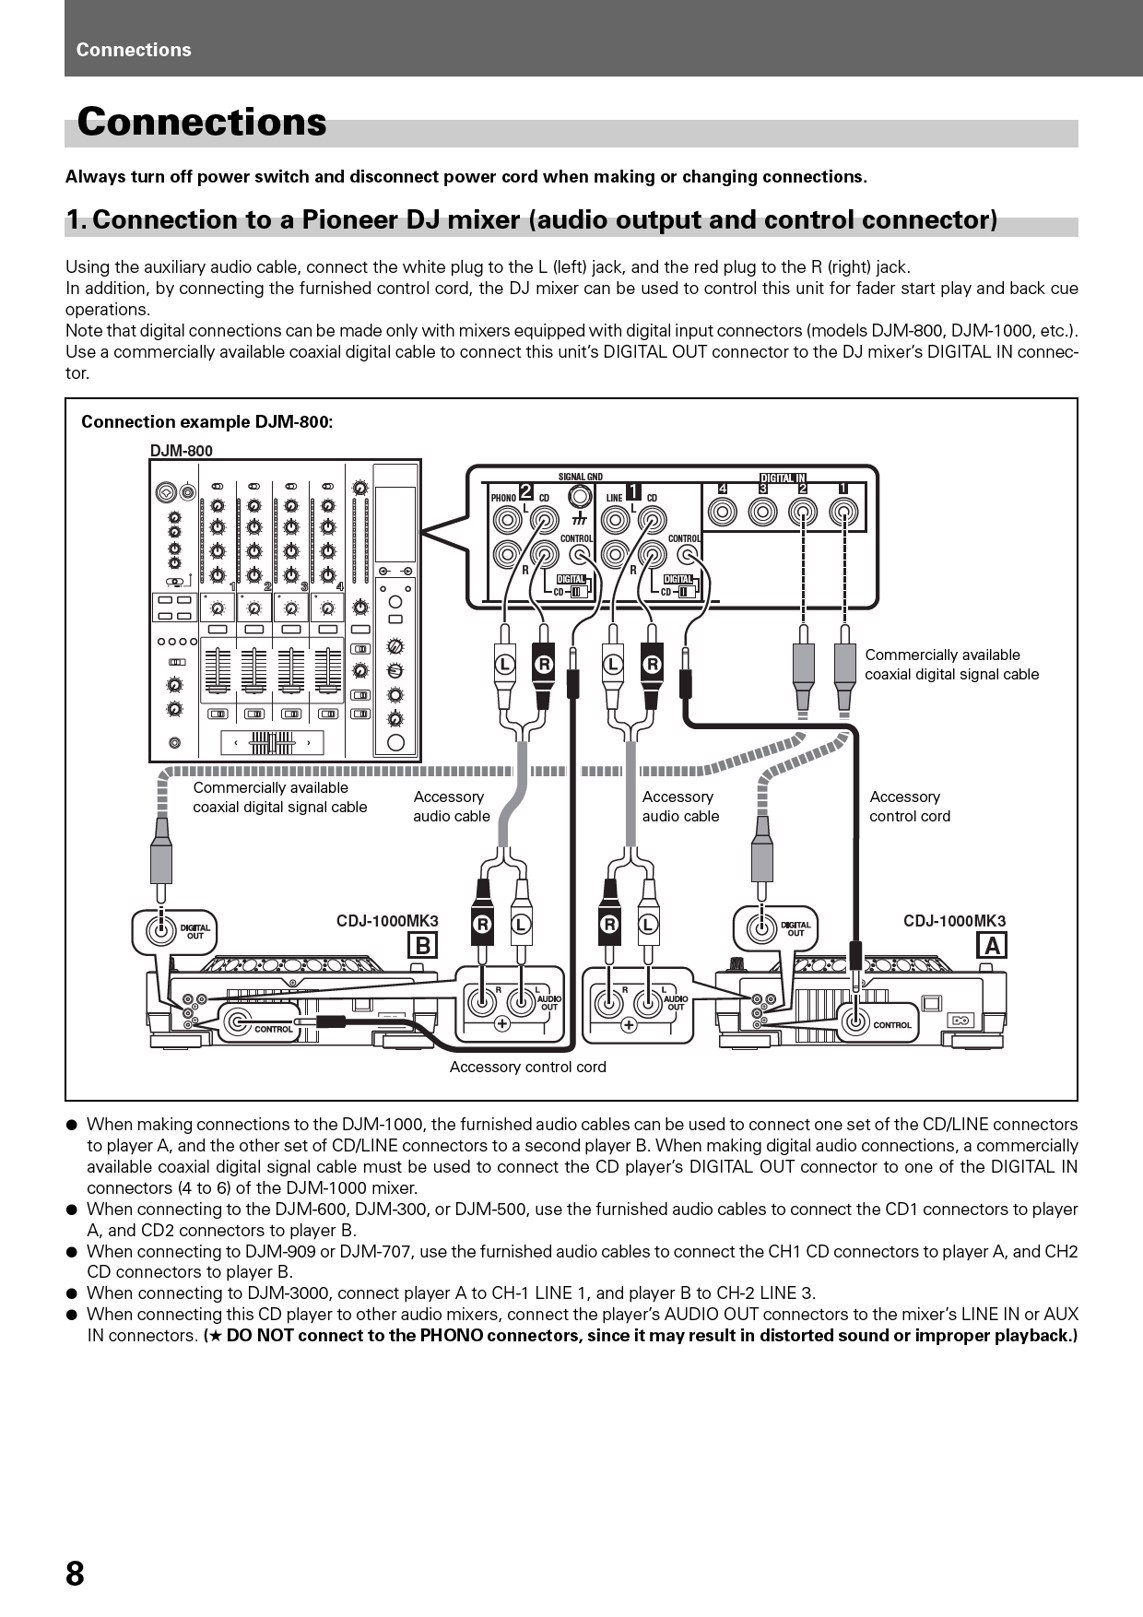
Connections Connections Always turn off power switch and disconnect power cord when making or changing connections. 1. Connection to a Pioneer DJ mixer (audio output and control connector) Using the auxiliary audio cable, connect the white plug to the L (left) jack, and the red plug to the R (right) jack. In addition, by connecting the furnished control cord, the DJ mixer can be used to control this unit for fader start play and back cue operations. Note that digital connections can be made only with mixers equipped with digital input connectors (models DJM-800, DJM-1000, etc.). Use a commercially available coaxial digital cable to connect this unit’s DIGITAL OUT connector to the DJ mixer’s DIGITAL IN connec- tor. Connection example DJM-800: DJM-800 SIGNAL GND PHONO CD L LINE CD L CONTROL CONTROL R DIGITAL CD R DIGITAL CD DIGITAL IN Commercially available coaxial digital signal cable Commercially available coaxial digital signal cable Accessory audio cable CDJ-1000MK3 B Accessory audio cable Accessory control cord CDJ-1000MK3 A Accessory control cord ¶ When making connections to the DJM-1000, the furnished audio cables can be used to connect one set of the CD/LINE connectors to player A, and the other set of CD/LINE connectors to a second player B. When making digital audio connections, a commercially available coaxial digital signal cable must be used to connect the CD player’s DIGITAL OUT connector to one of the DIGITAL IN connectors (4 to 6) of the DJM-1000 mixer. ¶ When connecting to the DJM-600, DJM-300, or DJM-500, use the furnished audio cables to connect the CD1 connectors to player A, and CD2 connectors to player B. ¶ When connecting to DJM-909 or DJM-707, use the furnished audio cables to connect the CH1 CD connectors to player A, and CH2 CD connectors to player B. ¶ When connecting to DJM-3000, connect player A to CH-1 LINE 1, and player B to CH-2 LINE 3. ¶ When connecting this CD player to other audio mixers, connect the player’s AUDIO OUT connectors to the mixer’s LINE IN or AUX IN connectors. ( # DO NOT connect to the PHONO connectors, since it may result in distorted sound or improper playback.) 8
Page number 9
Before Operating (Names and FunctioCnosnnoef cPtaiortnss) 2. Control cord connections for relay play By using the accessory control cord to connect the control connectors of two DJ CD Players, automatic relay play can be performed. ( P.19) CDJ-1000MK3 CDJ-1000MK3 Accessory control cord 3. Connecting other components A Connecting a stereo amplifier (when not using DJ mixer) Stereo amplifier Connect to CD or AUX IN connectors. (Do not connect to PHONO IN connectors.) CDJ-1000MK3 Accessory audio cable B Connecting a component equipped with DIGITAL IN connectors CD recorder or amplifier with DIGITAL IN connectors, etc. Commercially available coaxial digital signal cable CDJ-1000MK3 ¶ The DIGITAL OUT connectors produce audio data only (without subcodes; CD graphics are not supported). Depending on the CD recorder or other component connected, some recording or other functions may be limited. For details, consult the operating instructions for the connected component. 4. Connecting the power cord After completing all other connections, connect one end of the accessory power cord to the AC inlet on the rear side of the player, and connect the other end to a standard AC wall outlet, or to the auxiliary power outlet on your amplifier. 9